This article introduces the fundamental concepts behind SQL Server 2008 Application Role and illustrates its use in securing data and database objects.
1. Introduction
This article introduces the concepts behind SQL Server 2008 Application Role. Besides the concepts, the article presents the following aspects around creating and using application roles.
- Creating Application Role and associating database schema and granting permissions to the application role
- Create a Windows Form Application for illustration of the following
- Enabling and Disabling Application Role
- Using cookie (introduced starting with SQL Server 2005) to unset an application role
- Life Cycle of an Application Role
2. Background
Application role is a database level principal. It may own one or more database schema and be granted specific permissions. The application accesses data with the permissions of the application role irrespective of who is connected to the database. The application role needs to be enabled for it to be active. This provides a level of security for the data and other database objects. Any one wishing to access data using the application as a gateway will be restricted by the application role that lives during the life of the current application instance.
3. Sample Application - An Illustrative Example
The best way to understand the application role is to work with an actual application that uses application role to access the database. So, let me present an actual Windows Forms based application that controls read-only access to the
HumanResources.Employee table in the AdventureWorks database. Note that HumanResources is the schema under which the Employee table exists. I used AdventureWorks database, but you may create your own database and table and use it if you like. The sample application I present is simple enough to be modified for your SQL Server instance, database and tables.3.1 Create an Application Role
Open SQL Server Enterprise Manager console connecting as administrator and expand the
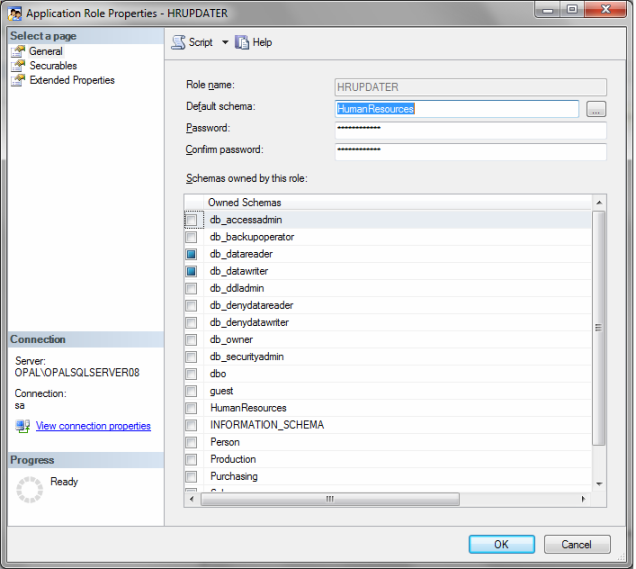
AdventureWorks sample database (You may download and install AdventureWorks sample database available online, if you do not already have it on your SQL Server instance). Expand Roles node under Security. Right click the Application Roles node and click New Application Role... menu. The dialog under the General tab to create the role is shown in the figure below:
I have named the role as
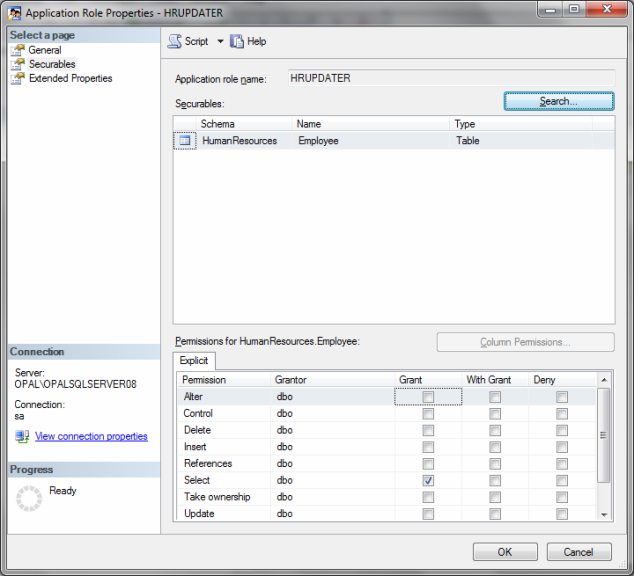
HRUPDATER. Select the schema as HumanResources and the database schemas owned by the role as db_datareader and db_datawriter. Now, select the Securables tab below the General tab. This displays the dialog for you to select the database object you want to secure and grant necessary permission to theHRUPDATER role on the object. Select the Employee table under HumanResources schema as shown in the dialog below by clicking the Search... button. Then check the Select permission under the Grant column.
Close the dialogs by clicking Ok button and verify that the
HRUPDATER role is created under the Application Role node.
Create a user under
AdventureWorks database from an existing login. For this example, I created a login calledsqluser and used the same name to create a database user. Note that this user does not have any permission at all on any of the AdventureWorks database objects. Add this login as a user under the master database, name it as sqluser and give it execute permission for the two system stored procedures namely, sys.sp_setapprole andsys.sp_unsetapprole. This is done to allow the same user who is logged in to the database to enable and disable the application role. This is done for illustration only.3.2 Create a Windows Form Application
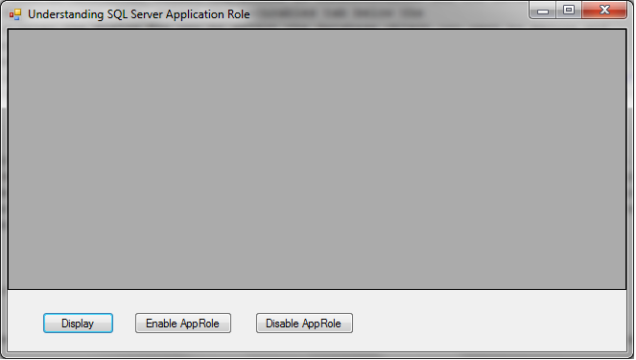
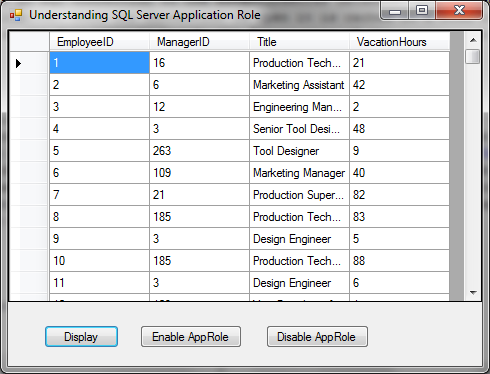
Create a simple Windows Forms application. I used Visual Studio 2008, C# and .NET 3.5 to create an application as shown in the figure below. The simple form includes a
DataGridView control and three buttons as shown.
The form on load event opens an SQL connection to the
AdventureWorks database. The connection string is configured in the app.config file of the application. Once the connection is open, it is cached in a form level variable. Once the form is launched, do the following to verify the functioning of the application role.
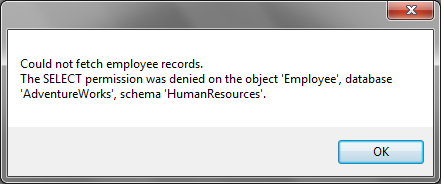
Click the Display button. The click event of the Display button uses the current connection of the user and tries to fetch the
Employee records from the Employee table. Recall that the user sqluser does not have any read access to the Employee table. Thus, the following access prohibited dialog is displayed.
Now, click Ok on the error dialog and click the Enable AppRole button. This button click event executes the
sys.sp_setapprole procedure with required parameters and stores the returned cookie in a byte array in a form scoped variable. This cookie is used to disable the application role. After enabling the application role, click the Display button again and this time the grid view will be populated with the results of the SQL query.
Now, click the Disable AppRole button. The button click event will clear the grid view of data and then disable the application role using the cookie. Now, if you click the Display button, the access to the
Employee table data will be prohibited and an error will be generated. In this example, application role provides more access than the user permission. A reverse situation can also be tested where the user can access and display the data but the application role will prohibit access.4. Code Discussion
The following are code snippets for the discussion in this article. You can also download the complete solution, modify the connection parameters and test on your local computer.
// Reading the connection string variable from app.config
private string ReadConfigurationString()
{
    string configName = "ADWorksConnectionString";
    string connStr = "";
    try
    {
        connStr = ConfigurationManager.ConnectionStrings[configName].ConnectionString;
    }
    catch (System.Configuration.ConfigurationException ex)
    {
        connStr = "";
    }
    catch(Exception ex)
    {
        connStr = "";
    }
    return connStr;
}

// Fetching the HumanResources.Employee data
private DataSet GetAdventureEmployees(out string msg)
{
    msg = "";

    string sqlCommandString = "SELECT EmployeeID, ManagerID, Title,
    VacationHours FROM HumanResources.Employee";
    SqlCommand cmd = new SqlCommand(sqlCommandString);
    if ((this._sqlConn == null) || (this._sqlConn.State != ConnectionState.Open))
    {
        this.OpenSqlConnection();
    }
    cmd.Connection = this._sqlConn;
    SqlDataAdapter da = new SqlDataAdapter();
    da.SelectCommand = cmd;

    DataSet ds = new DataSet();
    try
    {
        da.Fill(ds);
    }
    catch (Exception ex)
    {
        ds = null;
        msg = "Could not fetch employee records." + Environment.NewLine + ex.Message;
    }

    return ds;
}

// Display button click event handler
private void btnFetchData_Click(object sender, EventArgs e)
{
    // Read the configuration string and fetch AdventureWorks data for
    // display.
    string errMsg = "";
    DataSet ds = GetAdventureEmployees(out errMsg);
    if (ds == null)
    {
        MessageBox.Show(errMsg);
    }
    else
    {
        this.dgvAdventureData.DataSource = ds.Tables[0].DefaultView;
    }
}

// Method to enable the HRUPDATER application role.
private bool ExecuteEnableAppRole(string procName, out string msg)
{
    msg = "";
    bool result = true;
    SqlCommand cmd = new SqlCommand(procName);
    cmd.CommandType = CommandType.StoredProcedure;
    cmd.Connection = _sqlConn;
    SqlParameter paramAppRoleName = new SqlParameter();
    paramAppRoleName.Direction = ParameterDirection.Input;
    paramAppRoleName.ParameterName = "@rolename";
    paramAppRoleName.Value = "HRUPDATER";
    cmd.Parameters.Add(paramAppRoleName);

    SqlParameter paramAppRolePwd = new SqlParameter();
    paramAppRolePwd.Direction = ParameterDirection.Input;
    paramAppRolePwd.ParameterName = "@password";
    paramAppRolePwd.Value = "manu1962";
    cmd.Parameters.Add(paramAppRolePwd);

    SqlParameter paramCreateCookie = new SqlParameter();
    paramCreateCookie.Direction = ParameterDirection.Input;
    paramCreateCookie.ParameterName = "@fCreateCookie";
    paramCreateCookie.DbType = DbType.Boolean;
    paramCreateCookie.Value = 1;
    cmd.Parameters.Add(paramCreateCookie);

    SqlParameter paramEncrypt = new SqlParameter();
    paramEncrypt.Direction = ParameterDirection.Input;
    paramEncrypt.ParameterName = "@encrypt";
    paramEncrypt.Value = "none";
    cmd.Parameters.Add(paramEncrypt);

    SqlParameter paramEnableCookie = new SqlParameter();
    paramEnableCookie.ParameterName = "@cookie";
    paramEnableCookie.DbType = DbType.Binary;
    paramEnableCookie.Direction = ParameterDirection.Output;
    paramEnableCookie.Size = 1000;
    cmd.Parameters.Add(paramEnableCookie);

    try
    {
        cmd.ExecuteNonQuery();
        SqlParameter outVal = cmd.Parameters["@cookie"];
        // Store the enabled cookie so that approle  can be disabled with the cookie.
        _appRoleEnableCookie = (byte[]) outVal.Value;
    }
    catch (Exception ex)
    {
        result = false;
        msg = "Could not execute enable approle proc." + Environment.NewLine + ex.Message;
    }

    return result;
}

// Method to enable application role
private void btnEnableAppRole_Click(object sender, EventArgs e)
{
    // Enable the Application role on the database.
    string errMsg = "";
    this.dgvAdventureData.DataSource = null;
    bool result = ExecuteEnableAppRole("sys.sp_setapprole", out errMsg);
    if (!result)
    {
        MessageBox.Show(errMsg);
    }
}

// Enable AppRole button click event.
private bool ExecuteDisableAppRole(string procName, out string msg)
{
    msg = "";
    bool result = true;
    SqlCommand cmd = new SqlCommand(procName);
    cmd.CommandType = CommandType.StoredProcedure;
    cmd.Connection = _sqlConn;
    SqlParameter paramEnableCookie = new SqlParameter();
    paramEnableCookie.Direction = ParameterDirection.Input;
    paramEnableCookie.ParameterName = "@cookie";
    paramEnableCookie.Value = this._appRoleEnableCookie;
    cmd.Parameters.Add(paramEnableCookie);

    try
    {
        cmd.ExecuteNonQuery();
        _appRoleEnableCookie = null;
    }
    catch (Exception ex)
    {
        result = false;
        msg = "Could not execute disable approle proc." + Environment.NewLine + ex.Message;
    }

    return result;
}

// Disable AppRole button click event.
private void btnDisableAppRole_Click(object sender, EventArgs e)
{
    // Enable the Application role on the database.
    string errMsg = "";
    this.dgvAdventureData.DataSource = null;
    bool result = ExecuteDisableAppRole("sys.sp_unsetapprole", out errMsg);
    if (!result)
    {
        MessageBox.Show(errMsg);
    }
}

// Method to open sql connection
private void OpenSqlConnection()
{
    string connStr = ReadConfigurationString();
    if (string.IsNullOrEmpty(connStr))
    {
        return;
    }
    this._sqlConn = new SqlConnection(connStr);
    try
    {
        _sqlConn.Open();
    }
    catch (Exception ex)
    {
        this._sqlConn = null;
        MessageBox.Show("Could open connection." + Environment.NewLine + ex.Message);
    }
}

// Method to close sql connection.
private void CloseSqlConnection()
{
    if ((this._sqlConn != null) && (this._sqlConn.State == ConnectionState.Open))
    {
        this._sqlConn.Close();
        this._sqlConn = null;
    }
}
5. Points of Interest
- Application Role provides a level of security at the application to control access to database objects.
- Application Role once set lives for the life of the current connection to the database.
- The system stored procedures
sys.sp_setapproleandsys.sp_unsetapproleare provided to enable and disable application role. sys.sp_setapprolereturns a cookie that can be used to unset the application role.
 Note
Note
