31 Oct 2013

UPLOAD FILES WITH PROGRESS BAR IN ASP.NET USING JQUERY

In this article I will explain how to upload multiple files AJAX style along with progress bar in ASP.Net using jQuery Uploadify Plugin.
And the answer is Uploadify plugin for JQuery which does the same in few simple steps. In this article I’ll explain the same.

Step 1
Download the Uploadify JQuery plugin and the JQuery Library using the links below.

Download JQuery

Download Uploadify

Once downloaded you’ll need to place the below four files
1. jquery-1.3.2.min.js
2. jquery.uploadify.js
3. uploader.fla
4. uploader.swf
in a folder called scripts in the root folder of your ASP.Net website application

Step 2
Start Visual Studio, create a new website and do as done below

Inherit the following files you downloaded earlier in the head section of the aspx or the master page
<link rel="Stylesheet" type="text/css" href="CSS/uploadify.css" />
<script type="text/javascript" src="scripts/jquery-1.3.2.min.js"></script>
<script type="text/javascript" src="scripts/jquery.uploadify.js"></script>

Add an ASP.Net FileUpload Control to the form tag
<form id="form1" runat="server">
    <div style = "padding:40px">
        <asp:FileUpload ID="FileUpload1" runat="server" />
    </div>
</form>

Place the following script in the head section or the ContentPlaceHolder in case you are using Master Pages
<script type = "text/javascript">
$(window).load(
    function() {
    $("#<%=FileUpload1.ClientID %>").fileUpload({
        'uploader''scripts/uploader.swf',
        'cancelImg''images/cancel.png',
        'buttonText''Browse Files',
        'script''Upload.ashx',
        'folder''uploads',
        'fileDesc''Image Files',
        'fileExt''*.jpg;*.jpeg;*.gif;*.png',
        'multi'true,
        'auto'true
    });
   }
);
</script>  

As you can see we need to specify some settings along with the FileUpload control. The complete list of settings and their description is available here
Important setting to point out is 'script''Upload.ashx'  which will handle the FileUpload and save the uploaded files on to the disk.
Below is the code for the Upload.ashx file
    
C#
<%@ WebHandler Language="C#" Class="Upload" %>

using System;
using System.Web;
using System.IO;

public class Upload : IHttpHandler {
   
    public void ProcessRequest (HttpContext context) {
        context.Response.ContentType = "text/plain";
        context.Response.Expires = -1;
        try
        {
            HttpPostedFile postedFile = context.Request.Files["Filedata"];
           
            string savepath = "";
            string tempPath = "";
            tempPath = System.Configuration.ConfigurationManager.AppSettings["FolderPath"];
            savepath = context.Server.MapPath(tempPath);
            string filename = postedFile.FileName;
            if (!Directory.Exists(savepath))
                Directory.CreateDirectory(savepath);

            postedFile.SaveAs(savepath + @"\" + filename);
            context.Response.Write(tempPath + "/" + filename);
            context.Response.StatusCode = 200;
        }
        catch (Exception ex)
        {
            context.Response.Write("Error: " + ex.Message);
        }
    }

    public bool IsReusable {
        get {
            return false;
        }
    }
}

VB.Net
<%@ WebHandler Language="VB" Class="UploadVB" %>

Imports System
Imports System.Web
Imports System.IO

Public Class UploadVB : Implements IHttpHandler
   
    Public Sub ProcessRequest(ByVal context As HttpContext) ImplementsIHttpHandler.ProcessRequest
        Dim postedFile As HttpPostedFile = context.Request.Files("Filedata")

        Dim savepath As String = ""
        Dim tempPath As String = ""
        tempPath = System.Configuration.ConfigurationManager.AppSettings("FolderPath")
        savepath = context.Server.MapPath(tempPath)
        Dim filename As String = postedFile.FileName
        If Not Directory.Exists(savepath) Then
            Directory.CreateDirectory(savepath)
        End If

        postedFile.SaveAs((savepath & "\") + filename)
        context.Response.Write((tempPath & "/") + filename)
        context.Response.StatusCode = 200
    End Sub

    Public ReadOnly Property IsReusable() As Boolean Implements IHttpHandler.IsReusable
        Get
            Return False
        End Get
    End Property

End Class

As you will notice that the handler simply accepts the posted files and saves the file in folder called uploads inside the website root directory whose path is placed in an AppSettings key in the Web.Config file Refer below
<appSettings>
    <add key ="FolderPath" value ="uploads"/>
</appSettings >

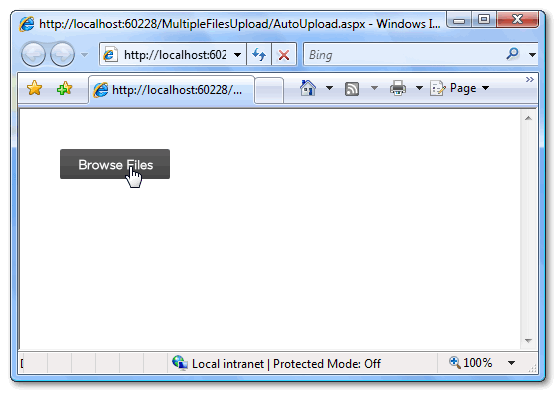
That’s all you need to do now run the application and you’ll notice your website running
Browsing the File
Uploading Multiple Files like GMAIL in ASP.Net with AJAX and progressbar

Selecting Multiple Files Simultaneously
Selecting Multiple files in single browse ASP.Net

Uploading Multiple Files with upload progress

Uploading Multiple Files with Upload progress using AJAX ASP.Net
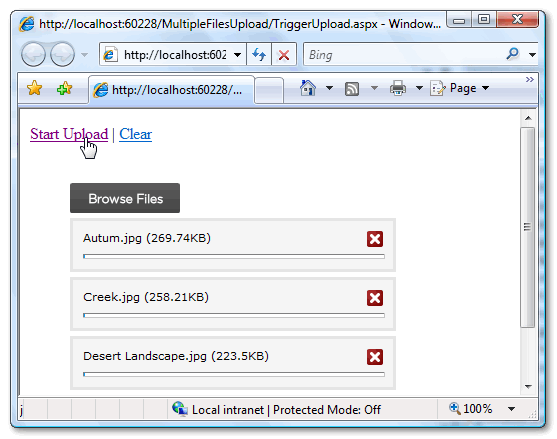
You might have noticed that the files are auto uploaded once browsed if you do not want this feature you can simply set the'auto' settings to false. But in that case you’ll need to provide a trigger the uploading of files on user interaction by placing an Upload button
First you’ll need to set the Auto Upload setting to false refer the bold part
<script type = "text/javascript">
$(window).load(
    function() {
        $("#<%=FileUpload1.ClientID%>").fileUpload({
        'uploader''scripts/uploader.swf',
        'cancelImg''images/cancel.png',
        'buttonText''Browse Files',
        'script''Upload.ashx',
        'folder''uploads',
        'fileDesc''Image Files',
        'fileExt''*.jpg;*.jpeg;*.gif;*.png',
        'multi'true,
        'auto'false
    });
   }
);
</script>

Then add the following link that will trigger the upload
<a href="javascript:$('#<%=FileUpload1.ClientID%>').fileUploadStart()">Start Upload</a>

That’s it now until user clicks the above link uploading of files won’t take place. Now since the upload is triggered by user it would be great to give him an additional link to clear the browsed files in one go
<a href="javascript:$('#<%=FileUpload1.ClientID%>').fileUploadClearQueue()">Clear</a>


The above code has been tested in the following browsers

Internet Explorer  FireFox  Chrome  Safari  Opera 
* All browser logos displayed above are property of their respective owners.

26 Oct 2013

Get Table Structure SQL Server 2008

SELECT c.name                    AS [column name]
       ,DATA_TYPE                [data type]
       ,CHARACTER_MAXIMUM_LENGTH [length]
       ,IS_NULLABLE              [isnull]
       ,cd.value                 AS [desc]
FROM   sysobjects t
       INNER JOIN sysusers u ON u.uid = t.uid
       LEFT OUTER JOIN sys.extended_properties td ON td.major_id = t.id
                                                     AND td.minor_id = 0
                                                     AND td.name = 'MS_Description'
       INNER JOIN syscolumns c ON c.id = t.id
       LEFT OUTER JOIN sys.extended_properties cd ON cd.major_id = c.id
                                                     AND cd.minor_id = c.colid
                                                     AND cd.name = 'MS_Description'
       LEFT OUTER JOIN INFORMATION_SCHEMA.COLUMNS ON t.name = TABLE_NAME
                                                     AND c.name = COLUMN_NAME
WHERE  t.type = 'u'
       AND t.name = 'TableName'
ORDER  BY t.name
          ,c.colorder

Stored Procedure to make Insert Query for a table

CREATE PROC [dbo].[sp_generate_inserts] (@table_name          VARCHAR(776),-- The table/view for which the INSERT statements will be generated using the existing data
                                        @Where               VARCHAR(max)='',
                                        @target_table        VARCHAR(776) = NULL,-- Use this parameter to specify a different table name into which the data will be inserted
                                        @include_column_list BIT = 1,-- Use this parameter to include/ommit column list in the generated INSERT statement
                                        @from                VARCHAR(800) = NULL,-- Use this parameter to filter the rows based on a filter condition (using WHERE)
                                        @include_timestamp   BIT = 0,-- Specify 1 for this parameter, if you want to include the TIMESTAMP/ROWVERSION column's data in the INSERT statement
                                        @debug_mode          BIT = 0,-- If @debug_mode is set to 1, the SQL statements constructed by this procedure will be printed for later examination
                                        @owner               VARCHAR(64) = NULL,-- Use this parameter if you are not the owner of the table
                                        @ommit_images        BIT = 0,-- Use this parameter to generate INSERT statements by omitting the 'image' columns
                                        @ommit_identity      BIT = 0,-- Use this parameter to ommit the identity columns
                                        @top                 INT = NULL,-- Use this parameter to generate INSERT statements only for the TOP n rows
                                        @cols_to_include     VARCHAR(8000) = NULL,-- List of columns to be included in the INSERT statement
                                        @cols_to_exclude     VARCHAR(8000) = NULL,-- List of columns to be excluded from the INSERT statement
                                        @disable_constraints BIT = 0,-- When 1, disables foreign key constraints and enables them after the INSERT statements
                                        @ommit_computed_cols BIT = 0 -- When 1, computed columns will not be included in the INSERT statement
)
AS
BEGIN

    SET NOCOUNT ON

    --Making sure user only uses either @cols_to_include or @cols_to_exclude
    IF ( ( @cols_to_include IS NOT NULL )
         AND ( @cols_to_exclude IS NOT NULL ) )
    BEGIN
        RAISERROR('Use either @cols_to_include or @cols_to_exclude. Do not use both the parameters at once',16,1)

        RETURN -1 --Failure. Reason: Both @cols_to_include and @cols_to_exclude parameters are specified
    END

    --Making sure the @cols_to_include and @cols_to_exclude parameters are receiving values in proper format
    IF ( ( @cols_to_include IS NOT NULL )
         AND ( Patindex('''%''', @cols_to_include) = 0 ) )
    BEGIN
        RAISERROR('Invalid use of @cols_to_include property',16,1)

        PRINT 'Specify column names surrounded by single quotes and separated by commas'

        PRINT 'Eg: EXEC sp_generate_inserts titles, @cols_to_include = "''title_id'',''title''"'

        RETURN -1 --Failure. Reason: Invalid use of @cols_to_include property
    END

    IF ( ( @cols_to_exclude IS NOT NULL )
         AND ( Patindex('''%''', @cols_to_exclude) = 0 ) )
    BEGIN
        RAISERROR('Invalid use of @cols_to_exclude property',16,1)

        PRINT 'Specify column names surrounded by single quotes and separated by commas'

        PRINT 'Eg: EXEC sp_generate_inserts titles, @cols_to_exclude = "''title_id'',''title''"'

        RETURN -1 --Failure. Reason: Invalid use of @cols_to_exclude property
    END

    --Checking to see if the database name is specified along wih the table name
    --Your database context should be local to the table for which you want to generate INSERT statements
    --specifying the database name is not allowed
    IF ( Parsename(@table_name, 3) ) IS NOT NULL
    BEGIN
        RAISERROR('Do not specify the database name. Be in the required database and just specify the table name.',16,1)

        RETURN -1 --Failure. Reason: Database name is specified along with the table name, which is not allowed
    END

    --Checking for the existence of 'user table' or 'view'
    --This procedure is not written to work on system tables
    --To script the data in system tables, just create a view on the system tables and script the view instead
    IF @owner IS NULL
    BEGIN
        IF ( ( Object_id(@table_name, 'U') IS NULL )
             AND ( Object_id(@table_name, 'V') IS NULL ) )
        BEGIN
            RAISERROR('User table or view not found.',16,1)

            PRINT 'You may see this error, if you are not the owner of this table or view. In that case use @owner parameter to specify the owner name.'

            PRINT 'Make sure you have SELECT permission on that table or view.'

            RETURN -1 --Failure. Reason: There is no user table or view with this name
        END
    END
    ELSE
    BEGIN
        IF NOT EXISTS (SELECT 1
                       FROM   INFORMATION_SCHEMA.TABLES
                       WHERE  TABLE_NAME = @table_name
                              AND ( TABLE_TYPE = 'BASE TABLE'
                                     OR TABLE_TYPE = 'VIEW' )
                              AND TABLE_SCHEMA = @owner)
        BEGIN
            RAISERROR('User table or view not found.',16,1)

            PRINT 'You may see this error, if you are not the owner of this table. In that case use @owner parameter to specify the owner name.'

            PRINT 'Make sure you have SELECT permission on that table or view.'

            RETURN -1 --Failure. Reason: There is no user table or view with this name
        END
    END

    --Variable declarations
    DECLARE @Column_ID     INT,
            @Column_List   VARCHAR(max),
            @Column_Name   VARCHAR(128),
            @Start_Insert  VARCHAR(max),
            @Data_Type     VARCHAR(128),
            @Actual_Values VARCHAR(max),--This is the string that will be finally executed to generate INSERT statements
            @IDN           VARCHAR(128) --Will contain the IDENTITY column's name in the table
    --Variable Initialization
    SET @IDN = ''
    SET @Column_ID = 0
    SET @Column_Name = ''
    SET @Column_List = ''
    SET @Actual_Values = ''

    IF @owner IS NULL
    BEGIN
        SET @Start_Insert = 'INSERT INTO ' + '[' + Rtrim(COALESCE(@target_table, @table_name)) + ']'
    END
    ELSE
    BEGIN
        SET @Start_Insert = 'INSERT ' + '[' + Ltrim(Rtrim(@owner)) + '].' + '[' + Rtrim(COALESCE(@target_table, @table_name)) + ']'
    END

    --To get the first column's ID
    SELECT @Column_ID = Min(ORDINAL_POSITION)
    FROM   INFORMATION_SCHEMA.COLUMNS (NOLOCK)
    WHERE  TABLE_NAME = @table_name
           AND ( @owner IS NULL
                  OR TABLE_SCHEMA = @owner )

    --Loop through all the columns of the table, to get the column names and their data types
    WHILE @Column_ID IS NOT NULL
    BEGIN
        SELECT @Column_Name = Quotename(COLUMN_NAME)
               ,@Data_Type = DATA_TYPE
        FROM   INFORMATION_SCHEMA.COLUMNS (NOLOCK)
        WHERE  ORDINAL_POSITION = @Column_ID
               AND TABLE_NAME = @table_name
               AND ( @owner IS NULL
                      OR TABLE_SCHEMA = @owner )

        IF @cols_to_include IS NOT NULL --Selecting only user specified columns
        BEGIN
            IF Charindex('''' + Substring(@Column_Name, 2, Len(@Column_Name)-2) + '''', @cols_to_include) = 0
            BEGIN
                GOTO SKIP_LOOP
            END
        END

        IF @cols_to_exclude IS NOT NULL --Selecting only user specified columns
        BEGIN
            IF Charindex('''' + Substring(@Column_Name, 2, Len(@Column_Name)-2) + '''', @cols_to_exclude) <> 0
            BEGIN
                GOTO SKIP_LOOP
            END
        END

        --Making sure to output SET IDENTITY_INSERT ON/OFF in case the table has an IDENTITY column
        IF (SELECT COLUMNPROPERTY(Object_id(Quotename(COALESCE(@owner, User_name())) + '.' + @table_name), Substring(@Column_Name, 2, Len(@Column_Name) - 2), 'IsIdentity')) = 1
        BEGIN
            IF @ommit_identity = 0 --Determing whether to include or exclude the IDENTITY column
                SET @IDN = @Column_Name
            ELSE
                GOTO SKIP_LOOP
        END

        --Making sure whether to output computed columns or not
        IF @ommit_computed_cols = 1
        BEGIN
            IF (SELECT COLUMNPROPERTY(Object_id(Quotename(COALESCE(@owner, User_name())) + '.' + @table_name), Substring(@Column_Name, 2, Len(@Column_Name) - 2), 'IsComputed')) = 1
            BEGIN
                GOTO SKIP_LOOP
            END
        END

        --Tables with columns of IMAGE data type are not supported for obvious reasons
        IF( @Data_Type IN ( 'image' ) )
        BEGIN
            IF ( @ommit_images = 0 )
            BEGIN
                RAISERROR('Tables with image columns are not supported.',16,1)

                PRINT 'Use @ommit_images = 1 parameter to generate INSERTs for the rest of the columns.'

                PRINT 'DO NOT ommit Column List in the INSERT statements. If you ommit column list using @include_column_list=0, the generated INSERTs will fail.'

                RETURN -1 --Failure. Reason: There is a column with image data type
            END
            ELSE
            BEGIN
                GOTO SKIP_LOOP
            END
        END

        --Determining the data type of the column and depending on the data type, the VALUES part of
        --the INSERT statement is generated. Care is taken to handle columns with NULL values. Also
        --making sure, not to lose any data from flot, real, money, smallmomey, datetime columns
        SET @Actual_Values = @Actual_Values + CASE WHEN @Data_Type IN ('char', 'varchar', 'nchar', 'nvarchar') THEN 'COALESCE('''''''' + REPLACE(RTRIM(' + @Column_Name + '),'''''''','''''''''''')+'''''''',''NULL'')' WHEN @Data_Type IN ('datetime', 'smalldatetime') THEN 'COALESCE('''''''' + RTRIM(CONVERT(char,' + @Column_Name + ',109))+'''''''',''NULL'')' WHEN @Data_Type IN ('uniqueidentifier') THEN 'COALESCE('''''''' + REPLACE(CONVERT(char(255),RTRIM(' + @Column_Name + ')),'''''''','''''''''''')+'''''''',''NULL'')' WHEN @Data_Type IN ('text', 'ntext') THEN 'COALESCE('''''''' + REPLACE(CONVERT(char(8000),' + @Column_Name + '),'''''''','''''''''''')+'''''''',''NULL'')' WHEN @Data_Type IN ('binary', 'varbinary') THEN 'COALESCE(RTRIM(CONVERT(char,' + 'CONVERT(int,' + @Column_Name + '))),''NULL'')' WHEN @Data_Type IN ('timestamp', 'rowversion') THEN CASE WHEN @include_timestamp = 0 THEN '''DEFAULT''' ELSE 'COALESCE(RTRIM(CONVERT(char,' + 'CONVERT(int,' + @Column_Name + '))),''NULL'')' END
                             WHEN
                             @Data_Type IN ('float',
                             'real', 'money', 'smallmoney') THEN 'COALESCE(LTRIM(RTRIM(' + 'CONVERT(char, ' + @Column_Name + ',2)' + ')),''NULL'')' ELSE 'COALESCE(LTRIM(RTRIM(' + 'CONVERT(char, ' + @Column_Name + ')' + ')),''NULL'')' END + '+' + ''',''' + ' + '
        --Generating the column list for the INSERT statement
        SET @Column_List = @Column_List + @Column_Name + ','

        SKIP_LOOP: --The label used in GOTO
        SELECT @Column_ID = Min(ORDINAL_POSITION)
        FROM   INFORMATION_SCHEMA.COLUMNS (NOLOCK)
        WHERE  TABLE_NAME = @table_name
               AND ORDINAL_POSITION > @Column_ID
               AND ( @owner IS NULL
                      OR TABLE_SCHEMA = @owner )
    --Loop ends here!
    END

    --To get rid of the extra characters that got concatenated during the last run through the loop
    SET @Column_List = LEFT(@Column_List, Len(@Column_List) - 1)
    SET @Actual_Values = LEFT(@Actual_Values, Len(@Actual_Values) - 6)

    IF Ltrim(@Column_List) = ''
    BEGIN
        RAISERROR('No columns to select. There should at least be one column to generate the output',16,1)

        RETURN -1 --Failure. Reason: Looks like all the columns are ommitted using the @cols_to_exclude parameter
    END

    --Forming the final string that will be executed, to output the INSERT statements
    IF ( @include_column_list <> 0 )
    BEGIN
        SET @Actual_Values = 'SELECT ' + CASE WHEN @top IS NULL OR @top < 0 THEN '' ELSE ' TOP ' + Ltrim(Str(@top)) + ' ' END + '''' + Rtrim(@Start_Insert) + ' ''+' + '''(' + Rtrim(@Column_List) + '''+' + ''')''' + ' +''VALUES(''+ ' + @Actual_Values + '+'')''' + ' ' + COALESCE(@from, ' FROM ' + CASE WHEN @owner IS NULL THEN '' ELSE '[' + Ltrim(Rtrim(@owner)) + '].' END + '[' + Rtrim(@table_name) + '] (NOLOCK) '+@where)
    END
    ELSE IF ( @include_column_list = 0 )
    BEGIN
        SET @Actual_Values = 'SELECT ' + CASE WHEN @top IS NULL OR @top < 0 THEN '' ELSE ' TOP ' + Ltrim(Str(@top)) + ' ' END + '''' + Rtrim(@Start_Insert) + ' '' +''VALUES(''+ ' + @Actual_Values + '+'')''' + ' ' + COALESCE(@from, ' FROM ' + CASE WHEN @owner IS NULL THEN '' ELSE '[' + Ltrim(Rtrim(@owner)) + '].' END + '[' + Rtrim(@table_name) + '] (NOLOCK) '+@where)
    END

    --Determining whether to ouput any debug information
    IF @debug_mode = 1
    BEGIN
        PRINT '/*****START OF DEBUG INFORMATION*****'

        PRINT 'Beginning of the INSERT statement:'

        PRINT @Start_Insert

        PRINT ''

        PRINT 'The column list:'

        PRINT @Column_List

        PRINT ''

        PRINT 'The SELECT statement executed to generate the INSERTs'

        PRINT @Actual_Values

        PRINT ''

        PRINT '*****END OF DEBUG INFORMATION*****/'

        PRINT ''
    END

    PRINT '--INSERTs generated by ''sp_generate_inserts'' stored procedure written by Vyas'

    PRINT '--Build number: 22'

    PRINT '--Problems/Suggestions? Contact Vyas @ vyaskn@hotmail.com'

    PRINT '--http://vyaskn.tripod.com'

    PRINT ''

    PRINT 'SET NOCOUNT ON'

    PRINT ''

    --Determining whether to print IDENTITY_INSERT or not
    IF ( @IDN <> '' )
    BEGIN
        PRINT 'SET IDENTITY_INSERT ' + Quotename(COALESCE(@owner, User_name())) + '.' + Quotename(@table_name) + ' ON'

        PRINT 'GO'

        PRINT ''
    END

    IF @disable_constraints = 1
       AND ( Object_id(Quotename(COALESCE(@owner, User_name())) + '.' + @table_name, 'U') IS NOT NULL )
    BEGIN
        IF @owner IS NULL
        BEGIN
            SELECT 'ALTER TABLE ' + Quotename(COALESCE(@target_table, @table_name)) + ' NOCHECK CONSTRAINT ALL' AS '--Code to disable constraints temporarily'
        END
        ELSE
        BEGIN
            SELECT 'ALTER TABLE ' + Quotename(@owner) + '.' + Quotename(COALESCE(@target_table, @table_name)) + ' NOCHECK CONSTRAINT ALL' AS '--Code to disable constraints temporarily'
        END

        PRINT 'GO'
    END

    PRINT ''

    PRINT 'PRINT ''Inserting values into ' + '[' + Rtrim(COALESCE(@target_table, @table_name)) + ']' + ''''

    --All the hard work pays off here!!! You'll get your INSERT statements, when the next line executes!
    EXEC (@Actual_Values)

    --PRINT @Actual_Values
    PRINT 'PRINT ''Done'''

    PRINT ''

    IF @disable_constraints = 1
       AND ( Object_id(Quotename(COALESCE(@owner, User_name())) + '.' + @table_name, 'U') IS NOT NULL )
    BEGIN
        IF @owner IS NULL
        BEGIN
            SELECT 'ALTER TABLE ' + Quotename(COALESCE(@target_table, @table_name)) + ' CHECK CONSTRAINT ALL' AS '--Code to enable the previously disabled constraints'
        END
        ELSE
        BEGIN
            SELECT 'ALTER TABLE ' + Quotename(@owner) + '.' + Quotename(COALESCE(@target_table, @table_name)) + ' CHECK CONSTRAINT ALL' AS '--Code to enable the previously disabled constraints'
        END

        PRINT 'GO'
    END

    PRINT ''

    IF ( @IDN <> '' )
    BEGIN
        PRINT 'SET IDENTITY_INSERT ' + Quotename(COALESCE(@owner, User_name())) + '.' + Quotename(@table_name) + ' OFF'

        PRINT 'GO'
    END

    PRINT 'SET NOCOUNT OFF'

    SET NOCOUNT OFF

    RETURN 0 --Success. We are done!
END
Stored Procedure for creating variables for SP of a table

CREATE PROCEDURE [dbo].[Usp_makespvariable] @tablename AS VARCHAR(50)
AS
BEGIN
    -- SET NOCOUNT ON added to prevent extra result sets from
    -- interfering with SELECT statements.
    SET NOCOUNT ON;

    -- Insert statements for procedure here
    SELECT '@' + i_s.COLUMN_NAME + ' ' + i_s.DATA_TYPE + ' ' + CASE WHEN i_s.DATA_TYPE LIKE '%char%' THEN '(' + CONVERT(VARCHAR, i_s.CHARACTER_MAXIMUM_LENGTH) + ')' ELSE '' END + ' , '
    FROM   INFORMATION_SCHEMA.COLUMNS AS i_s
           LEFT OUTER JOIN sys.extended_properties AS s ON s.major_id = Object_id(i_s.TABLE_SCHEMA + '.' + i_s.TABLE_NAME)
                                                           AND s.minor_id = i_s.ORDINAL_POSITION
                                                           AND s.name = 'MS_Description'
    WHERE  ( Objectproperty(Object_id(i_s.TABLE_SCHEMA + '.' + i_s.TABLE_NAME), 'IsMsShipped') = 0 )
           AND ( i_s.TABLE_NAME = @tablename )
    ORDER  BY i_s.ORDINAL_POSITION
END

25 Oct 2013

SQL SERVER – Collate – Case Sensitive SQL Query Search

Case Sensitive SQL Query Search

If Column1 of Table1 has following values ‘CaseSearch, casesearch, CASESEARCH, CaSeSeArCh’, following statement will return you all the four records.

SELECT Column1
FROM Table1
WHERE Column1 = 'casesearch'

To make the query case sensitive and retrieve only one record (“casesearch”) from above query, the collation of the query needs to be changed as follows.

SELECT Column1
FROM Table1
WHERE Column1 COLLATE Latin1_General_CS_AS = 'casesearch'

Adding COLLATE Latin1_General_CS_AS makes the search case sensitive.

Default Collation of the SQL Server installation SQL_Latin1_General_CP1_CI_AS is not case sensitive.

To change the collation of the any column for any table permanently run following query.

ALTER TABLE Table1
ALTER COLUMN Column1 VARCHAR(20)
COLLATE Latin1_General_CS_AS

To know the collation of the column for any table run following Stored Procedure.

EXEC sp_help DatabaseName

Second results set above script will return you collation of database DatabaseName.

7 Oct 2013

SQL SERVER – SQL Server Encryption and Symmetric Key Encryption

SQL Server 2005 and SQL Server 2008 provide encryption as a new feature to protect data against hackers’ attacks. Hackers might be able to penetrate the database or tables, but owing to encryption they would not be able to understand the data or make use of it. Nowadays, it has become imperative to encrypt crucial security-related data while storing in the database as well as during transmission across a network between the client and the server.
Encryption hierarchy is marked by three-level security. These three levels provide different mechanisms for securing data across networks and local servers. Different levels of hierarchies allow multiple instances of services (e.g., SQL Server Services) to run on one physical server.
  • Windows Level – Highest Level – Uses Windows DP API for encryption
  • SQL Server Level - Moderate Level – Uses Services Master Key for encryption
  • Database Level – Lower Level – Uses Database Master Key for encryption
There are two  kinds of keys used in encryption:
  • Symmetric Key – In Symmetric cryptography system, the sender and the receiver of a message share a single, common key that is used to encrypt and decrypt the message. This is relatively easy to implement, and both the sender and the receiver can encrypt or decrypt the messages.
  • Asymmetric Key – Asymmetric cryptography, also known as Public-key cryptography, is a system in which the sender and the receiver of a message have a pair of cryptographic keys – a public key and a private key – to encrypt and decrypt the message. This is a relatively complex system where the sender can use his key to encrypt the message but he cannot decrypt it. The receiver, on the other hand, can use his key to decrypt the message but he cannot encrypt it. This intricacy has turned it into a resource-intensive process.
Yet another way to encrypt data is through certificates. A public key certificate is a digitally signed statement that binds the value of a public key to the identity of the person, device, or service that holds the corresponding private key. A Certification Authority (CA) issues and signs certifications. Download complete script here.
Please create a sample database that we will be use for testing Encryption. There are two different kinds of encryptions available in SQL Server:
  • Database Level – This level secures all the data in a database. However, every time data is written or read from database, the whole database needs to be decrypted. This is a very resource-intensive process and not a practical solution.
  • Column (or Row) Level – This level of encryption is the most preferred method. Here, only columns containing important data should be encrypted; this will result in lower CPU load compared with the whole database level encryption. If a column is used as a primary key or used in comparison clauses (WHERE clauses, JOIN conditions) the database will have to decrypt the whole column to perform operations involving those columns.
Let’s go over a simple instance that demonstrates the encryption and the decryption process executed with Symmetric Key and Triple DES encryption algorithm.

/* Create Database  */
USE master
GO
CREATE DATABASE EncryptTestON PRIMARY NAME N'EncryptTest'FILENAME =N'C:\EncryptTest.mdf')LOG ON NAME N'EncryptTest_log'FILENAME =N'C:\EncryptTest_log.ldf')GO
First, let’s create a sample table and then populate it with sample data. We will now encrypt one of the two columns of the table.

/* Create table and insert data in the table */
USE EncryptTest
GO
CREATE TABLE TestTable (FirstCol INTSecondCol VARCHAR(50))GOINSERT INTO TestTable (FirstColSecondCol)SELECT 1,'First'UNION ALLSELECT 2,'Second'UNION ALLSELECT 3,'Third'UNION ALLSELECT 4,'Fourth'UNION ALLSELECT 5,'Fifth'GO/* Check the content of the TestTable */USE EncryptTest
GO
SELECT *FROM TestTable
GO
The preceding code will return the result depicted in the subsequent figure.
Result of the SQL query
Every database can have one master key. Database master key is a symmetric key used to protect the private keys of certificates and asymmetric keys present in the database. It uses Triple DES algorithm together with user-provided password to encrypt the keys.

/* Create Database Master Key */
USE EncryptTest
GO
CREATE MASTER KEY ENCRYPTIONBY PASSWORD 'SQLAuthority'GO
Certificates are used to safeguard encryption keys, which are used to encrypt data in the database. SQL Server 2005 has the capability to generate self-signed X.509 certificates.

/* Create Encryption Certificate */
USE EncryptTest
GO
CREATE CERTIFICATE EncryptTestCertWITH SUBJECT 'SQLAuthority'GO
The symmetric key can be encrypted by using various options such as certificate, password, symmetric key, and asymmetric key. A number of different algorithms can be employed for encrypting key. The supported algorithms are DES, TRIPLE_DES, RC2, RC4, RC4_128, DESX, AES_128, AES_192, and AES_256.

/* Create Symmetric Key */
USE EncryptTest
GO
CREATE SYMMETRIC KEY TestTableKeyWITH ALGORITHM TRIPLE_DES ENCRYPTIONBY CERTIFICATE EncryptTestCert
GO
Now add a column of type varbinary to the original table, which will store the encrypted value for the SecondCol.

/*  Encrypt Data using Key and Certificate
Add Columns which will hold the encrypted data in binary */
USE EncryptTest
GO
ALTER TABLE TestTableADD EncryptSecondCol VARBINARY(256)GO
Before the key is used, it needs to be decrypted using the same method that was used for encrypting it. In our example, we have used a certificate for encrypting the key. Because of the same reason, we are using the same certificate for opening the key and making it available for use. Subsequent to opening it and making it available for use, we can use the encryptkey function and store the encrypted values in the database, in the EncryptSecondCol column.

/* Update binary column with encrypted data created by certificate and key */
USE EncryptTest
GO
OPEN SYMMETRIC KEY TestTableKey DECRYPTIONBY CERTIFICATE EncryptTestCertUPDATE TestTableSET EncryptSecondCol =ENCRYPTBYKEY(KEY_GUID('TestTableKey'),SecondCol)GO
We can drop the original SecondCol column, which we have now encrypted in the EncryptSecondCol column. If you do not want to drop the column, you can keep it for future comparison of the data when we decrypt the column.

/* DROP original column which was encrypted for protect the data */
USE EncryptTest
GO
ALTER TABLE TestTableDROP COLUMN SecondCol
GO
We can run a SELECT query on our database and verify if our data in the table is well protected and hackers will not be able to make use of it even if they somehow manage to reach the data.
/* Check the content of the TestTable */USE EncryptTest
GO
SELECT *FROM TestTable
GO
Result of the previous SQL query
Authorized user can use the decryptbykey function to retrieve the original data from the encrypted column. If Symmetric key is not open for decryption, it has to be decrypted using the same certificate that was used to encrypt it. An important point to bear in mind here is that the original column and the decrypted column should have the same data types. If their data types differ, incorrect values could be reproduced. In our case, we have used a VARCHAR data type for SecondCol and EncryptSecondCol.
/* Decrypt the data of the SecondCol  */USE EncryptTest
GO
OPEN SYMMETRIC KEY TestTableKey DECRYPTIONBY CERTIFICATE EncryptTestCertSELECT CONVERT(VARCHAR(50),DECRYPTBYKEY(EncryptSecondCol)) ASDecryptSecondColFROM TestTable
GO
If you drop the database after the entire processing is complete, you do not have to worry about cleaning up the database. However, in real world on production servers, the database is not dropped. It is a good practice for developers to close the key after using it. If keys and certificates are used only once or their use is over, they can be dropped as well. Dropping a database will drop everything it contains – table, keys, certificates, all the data, to name a few.
/* Clean up database  */USE EncryptTest
GO
CLOSE SYMMETRIC KEY TestTableKey
GO
DROP SYMMETRIC KEY TestTableKey
GO
DROP CERTIFICATE EncryptTestCert
GO
DROP MASTER KEYGOUSE [master]
GO
DROP DATABASE [EncryptTest]
GO
Summary
Encryption is a very important security feature of SQL Server 2005. Long keys and asymmetric keys create unassailable, stronger encryption and stronger encryption uses lots of CPU to encrypt data. Stronger encryption is slower to process. When there is a huge amount of data to encrypt, it is suggested to encrypt it using a symmetric key. The same symmetric key can be encrypted further with an asymmetric key for additional protection, thereby adding the advantage of a stronger encryption. It is also recommended to compress data before encryption, as encrypted data cannot be compressed.

Click to Download Scripts

Reference : Pinal Dave (http://blog.SQLAuthority.com)